How to replace a Level Doorbell
If you need to replace a Level Doorbell, follow these steps:
- Confirm the Doorbell needs replacement
- Have Support associate the new Doorbell
- Replace the Doorbell
- Remind the resident to pair the new Doorbell
- Returning old doorbells
1. Confirm the Doorbell needs replacement
Important: Only replace a Doorbell after you've completed these troubleshooting steps:
- Check the Level Doorbell LED lights to confirm there is an issue.
- Reset the Doorbell.
2. Have Support associate the new Doorbell
Support needs to associate the new Doorbell with the unit before a resident can pair it. Please contact Support to provide:
- the serial number printed beside the QR code on the back of the Doorbell
- your property name
- the unit name
- the reason for replacement
Note: If the resident is ready to pair the Doorbell right away, please call Support at 1-833-760-2878.
3. Replace the Doorbell
To replace the Level Doorbell:
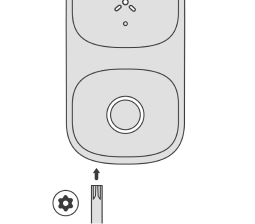
- Remove the T8 security screw at the bottom of the Doorbell using a T8 security screwdriver.
Note: A T8 security screwdriver has a hole in its center. - Remove the Doorbell from the mounting plate.
- Pull the bottom of the Doorbell away from the bottom of the mounting plate.
- Unlock the Doorbell from the top.
- Place the new Doorbell on the mounting plate.
- Hook the Doorbell to the top of the mounting plate.
- Ease the Doorbell in at the bottom.
- Secure the T8 security screw.
- Wait for the ring light to turn solid orange.
Note: The Doorbell takes 40 seconds to fully boot up.
4. Remind the resident to pair the new Doorbell
After replacing a Doorbell, the resident must pair the new Doorbell.
Tip: The resident won't see a reminder in the app to pair their Doorbell. Have the resident follow the steps in How to pair a Level Doorbell.
5. Returning old doorbells
- After a new Doorbell is installed, use the label provided by Support in your Support Case to return the device
- If you did not receive a return label please contact support at 1-833-760-2878 to generate a Fedex label and ship the device back to Ambient


